
Fig 1. Photo of a slipface, without adjustment
Photographs of dune and sandstone features are often low in contrast -- it's hard to see details (fig 1).
Fig 1. Photo of a slipface, without adjustment
Using a photo editing tool such as Photoshop, we can adjust the image such that the narrow contrast range occupied by the part of the image of interest is expanded to fill the entire range. This causes other parts of the photo to be clipped (lost to black or white) or 'posterized', but enhances the visibility of the low-contrast items of interest (fig 2).

Fig 2. After maximizing contrast to enhance details
The following Photoshop procedure adjusts the contrast to maximize details:

Fig 3. Photoshop 'curves' adjustment panel
If the sliders are moved into the portion of the histogram that represents the interesting part of the image, those parts will be clipped, causing information loss (to see what parts of your image will be clipped, hold down the Alt key as you move a slider).
The histogram in figure 3 is that of figure 1, with the sliders in the positions that produces figure 2. The small histogram peaks outside the sliders were clipped, eg., the right-most peak is the brink area, which is clipped to white in figure 2.
Here's another example -- a dinosaur track in low-contrast sandstone.

Fig 4. Photo without adjustment
Maximizing the contrast of the rock causes other parts of the photo (eg., the shoe and shadow area) to be clipped, but improves the visibility of the two large, three-toe tracks on either side of the shoe.

Fig 5. After maximizing contrast to enhance details
Of course it's possible to remove the colour component:

Fig 6. Black-and-white version of figure 5
Yet another example, this time using Photoshop CS3. As indicated by the histogram beneath the images (fig 7b and 8b), contrast enhancement maps the selected range of light levels across the full range available.

Fig 7a. Original photo (deformation in sandstone). |

Fig 8a. Contrast-enhanced. |
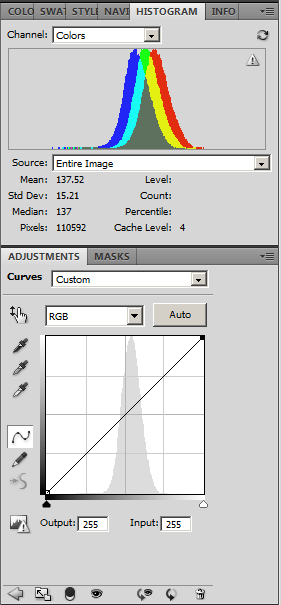
Fig 7b. Histogram and Curves tool displays for original photo. Note the narrow range of light levels indicated by the histograms. |

Fig 8b. Histogram after the settings in the Curves tool have been applied. The histogram now spans the entire available range of light levels. |
Most photo-editing tools have functions similar to Photoshop's Curve tool.